Thursday, May 25, 2017

AE 4K Solution - How to Import 4K Ultra HD video to After Effects

With the 4K resolution camera into the hands of consumers, editing 4K video demand has become the mainstream. In fact, 4K movies are limited to edited in After Effects. Only the latest version of Adobe After Effects CC can native support 4K video. Previous versions of After Effects CS6/CS5/CS4 have not been updated to 4K support. In addition, due to format restrictions, we can not perfect editing After Effects in a variety of 4K video files, such as 4K MP4, 4K MOV, 4K MXF, 4K XAVC, 4K Prores, and so on. What if you are having problems editing a 4K clip in After Effects? Read on to find something you need.


To resolve 4K and After Effects issues, the quick and easy workaround is to transcode the 4K videos to After Effects compatible videos and even downscale 4K to 1080p if necessary. The process is surprisingly easy and can be done with the help of Dimo Video Converter Ultimate for Mac . Overall, the program is the best 4K video converter for handling 4K videos. With this program, you can effortlessly transcode 4K video to MOV or MPEG-2, which will create an After Effects (also for Premiere Pro, Premiere Elements) friendly file format keeping the 4K original quality. 

Besides After Effects, this software can also export DNxHD for Avid, Apple ProRes for Final Cut Pro, Apple InterMediate Codec for iMovie and more NLE systems for native editing or output H.264 for playing on iPhone, iPad, Android, Android, etc.. Plus, this fastest video converter also enables you to downscale videos resolution without notice the difference by your eyes, along with custom video bitrate, frame rate to get your desired output video size, for uploading your 4k to YouTube, Vimeo etc. If you are the user of Windows computer, simply turn to Dimo Video Converter Ultimate to convert and transfer 4k videos on Win.

Free Download Dimo Video Converter Ultimate for Mac/Win:


Other Download: 
How to convert and import 4K video into After Effects

Step 1. Load source 4K videos

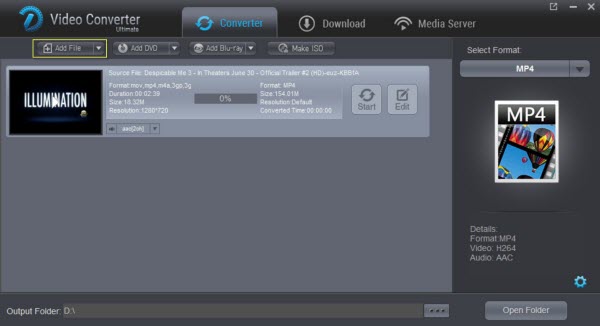
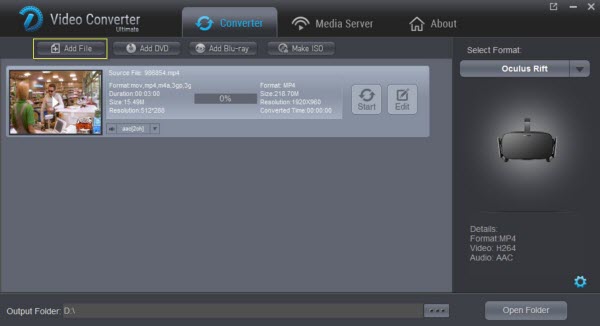
Launch the 4K video converter, and then click "Add File" and load your 4K HD files. This program supports batch conversion, so you can add multiple files into it at a time.


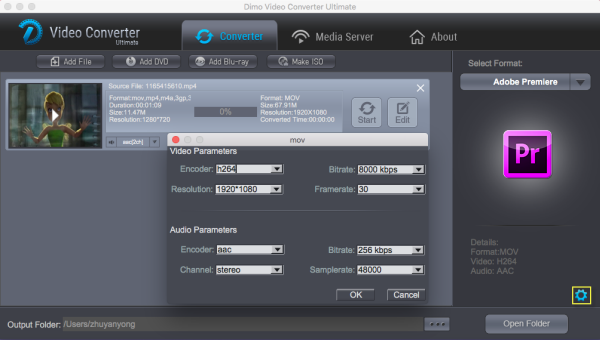
Step 2. Choose the output format

To encode 4K to After Effects, you can choose "Adobe Premiere" from "Editor" or select MOV, WMV or MPEG-2 from "Format > Video" as the output format. All output videos will keep the original quality of 4K video and seamlessly fit After Effects CC, CS6, CS5.5, CS5, CS4 and more.

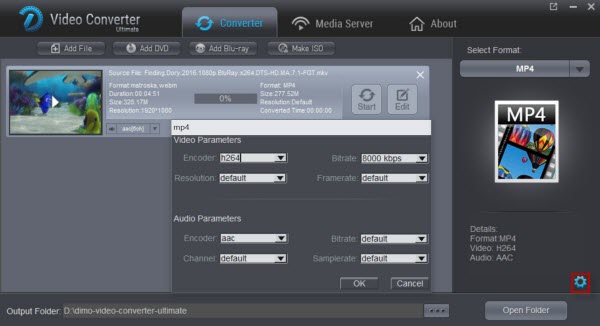
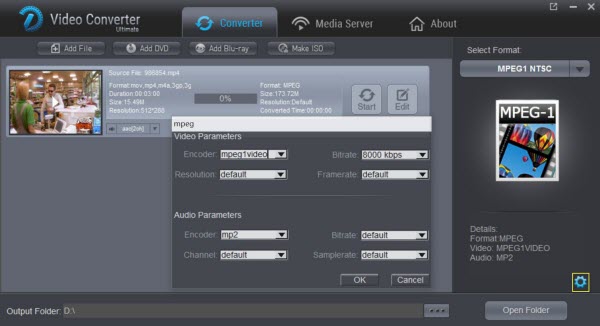
Tip: Adjust video and audio settings

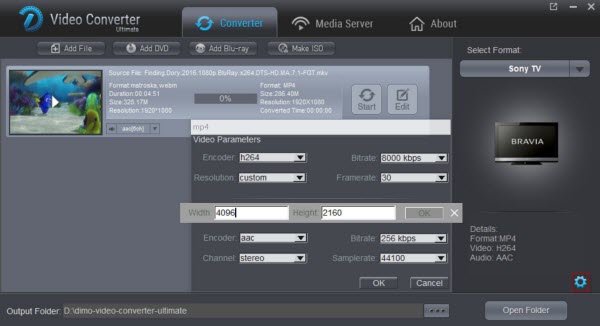
Click "Settings" button and customize proper video/audio parameters including Video size, bitrate and fame rate and more. If you are using After Effects CS6/CS5/CS4 which does not fully support native 4K files, 1080p would be the best settings. Of course, if you wanna get a 4K workflow in After Effects CC, you can keep the original 4K video resolution.


Step 3. Start converting 4K video to AE

Hit the "Start" button and this 4K file Converter for Mac will convert your 4K video for AE rapidly. After the conversion, you can import the output files to Adobe Effects CC/CS6/CS5/CS4 without any trouble.

In addition, this great Mac 4k video converter also allows you to fast share converted 4K file to from Mac or Win computer to mobile devices wirelessly, via its mature IP address sharing technology (i.e. Dimo Media Server). What's more, you can even convert edited videos export from editors into more popular formats. Congratulations! You have successfully taken the first step to make your own masterpiece.

Free Download or Purchase Dimo Video Converter Ultimate for Mac/Win:


Need the lifetime version to work on 2-4 Macs so that your friends and family can instantly broaden their entertainment options? Please refer to the family license here


Kindly Note:

The price of Dimo Video Converter Ultimate for Mac is divided into 1 Year Subscription, Lifetime/Family/Business License: $43.95/Year; $45.95/lifetime license; $95.95/family license(2-4 Macs); $189.95/business pack(5-8 Macs). Get your needed one at purchase page.

Contact us or leave a message at Facebook if you have any issues.

Related Articles:

Monday, May 22, 2017

Watch 3D Blu-ray films on VR Box via Android devices

If you are looking for your first VR experience or to buy someone a VR headset as a gift then the VR Box is a good choice. This plastic 3D VR Virtual Reality galsses will give you wonderful Real 3D Experience with 4.7-6.0 inches iOS, Android 4.0 smartphones. However, if you happen to have a bunch of 3D Blu-ray collections at home, it's a pity for you can not get them on your Andorid/iOS devices through VR Box with 3D effects. In this article, I'll glad to share some useful tips to help you move your 3D Blu-ray medias into VR Box for viewing freely on your smartphone.


As a matter of fact, VR Box lacks ability to play 3D Blu-ray movies but it can play Side-by-Side MP4 videos. That's to say, in order to view 3D Blu-ray movies in VR Box successfully, you're advised to rip and convert 3D Blu-ray to SBS MP4 videos initially, and then you can use the VR player app installed on VR Box to play the converted videos in 3D effect.

In order to finish all these tasks, here I strongly recommend you try Dimo Video Converter Ultimate for help. It is rated as the best solution out there to watch 3D Blu-ray movies on VR Box. With it, you can easily convert 2D/3D Blu-ray movies, DVDs, ISO folders and 2D/3D movies to MKV, AVI, WMV, MOV, MP4 with 3D effect to watch not only VR Box, but also other 3D Virtual Reality Devices such as Oculus Rift DK2, Zeiss VR One, Samsung Gear VR, Google Cardboard, etc with true theater entertainment at home instead of going to cinema. 

If you're using a Mac, you can turn to Dimo Video Converter Ultimate for Mac, which allows you to rip 3D Blu-ray to SBS 3D videos for playback on VR Box via Mac (OS Sierra included). Now download the right version and follow the step-by-step guide to start ripping 3D Blu-ray for viewing on VR Box.

Free Download Dimo Video Converter Ultimate (Win/Mac):


Other Download: 

Simple steps to Play 3D Blu-ray on VR Box via Android/iOS devices

Step 1: Import 3D Blu-ray movies

Launch the VR Box video converter and click "Add Blu-ray" button to import 3D Blu-ray into the program. After the BD files are loaded, you can preview them with the built-in Dimo player and choose your favorite audio track for output if you want.


Step 2. Select output format

Click "Select Format" bar and select MP4 or MOV as the output format from "Format" > "Video" or "Format > HD Video" list which is supported by VR Box.

Tip: Click Settings to adjust the parameters like video codec, video bitrate, video frame rate, audio sample rate, audio channel. 1920x1080 compressed side-by-side 3D should be resampled to 1920x540 resolution full side-by-side resolution. And keep audio in AAC or MP3.


Step 3. Add 3D effect

Click "Edit" and turn to 3D, then choose "Left-Right" and click "OK" to set 3D mode for viewing 3D Blu-ray on VR Box with 3D effect.


Step 4. Start converting 3D Blu-ray movies

When you have finished all the above settings, you can simply click the "Start" button on the main interface and let the software do the 3D Blu-ray to VR Box Glasses conversion for you.

After the conversion is over, head to the destination folder where the converted files are stored and get them to VR Box headset for enjoyment using its AAA VR Cinema 3D SBS Cardboard, Homido Player or Google Cardboard for iOS app without any hassles. Insert your smartphone into a tray for Smartphone, align and insert the VR helmet BOX. Now, just enjoy.

Related Software:

BDmate (Win/Mac)

Lossless backup Blu-ray to MKV with all audio and subtitle tracks; Rip Blu-ray to multi-track MP4; ConvertBlu-ray to almost all popular video/audio formats and devices; Copy Blu-ray to ISO/M2TS; Share digitized Blu-ray wirelessly.

DVDmate (Win/Mac)

A professional DVD ripping and editing tool with strong ability to remove DVD protection, transcode DVD to any video and audio format, and edit DVD to create personal movie.

Videomate (Win/Mac)

An all-around video converter software program that enables you to convert various video and audio files to formats that are supported by most multimedia devices.

8K Player (Win/Mac)

A mixture of free HD/4K video player, music player, Blu-ray/DVD player, video recorder and gif maker. 

Free Download or Purchase Dimo Video Converter Ultimate:


Need the lifetime version to work on 2-4 PCs so that your friends and family can instantly broaden their entertainment options? Please refer to the family license here


Kindly Note:

The price of Dimo Video Converter Ultimate for Windows is divided into 1 Year Subscription, Lifetime/Family/Business License: $43.95/Year; $45.95/lifetime license; $95.95/family license(2-4 PCs); $189.95/business pack(5-8 PCs). Get your needed one at purchase page.

Contact us or leave a message at Facebook if you have any issues.

Related Articles:

Friday, May 12, 2017

How to Play MP4 on Sony TV Easily

On my latest Sony Bravia TV, running the latest firmware and app, I find that the message of "Unable to playback" file appears mostly for MP4 files this seems to be the case, after loafing up via USB Drive. Even though a smart Sony Bravia TV is a big entertainment in our daily life. Nowadays it is convenient to put movies on USB drive and play on Sony Bravia TV via USB port or stream over DLNA. And Sony claims the Smart TV support MP4 files, however, we still encounter Sony Bravia TV won't play MP4 issues listed as the beginning. What'a the matter? In fact, it's refusing to play an MP4 file because of the unsupported either video or audio codec in the video file.


Actually, that happens and as common, not only to you! Why can't Sony TV play MP4 videos? As we all know, MP4 is simply a container video format. Different MP4 files tends to contain different video and audio codecs. If your MP4 files are encoded with unsupported video or audio codec and resolution certainly can't be played on the Sony Bravia TV. According to Sony official website, Sony TV supports formats including MPEG-1, MPEG-2, MPEG-4(Part 2 and 10), DivX SD, etc. You could get more compatible video file formats details of Sony here. 

And it's hard to find the right codecs and install them accordingly. Frankly, there is a smarter way to get rid of the incompatibility issues quickly - encode MP4 to Sony TV friendly format. To convert MP4 to Sony TV seamlessly and effortlessly, the solution for you is to find a third-party tool to make everything easy, if you insist on viewing the files on Sony Bravia TV via USB storage device.


The all-in-one and easy-to-use toolkit Dimo Video Converter Ultimate should be a great choice for you! With it, you don't need to know what is the earth video and audio codec in the MP4 format that'll be best for your Sony Bravia TV. You just need to choose the among the optimized presets for Sony Bravia TV and this program will do the rest for you. 

A while later, the video conversion will be finished and you'll be able to watch the awesome media content on Sony TV without having to compromise on the quality. Moreover, it can also allow you to make conversion from any video formats like AVI, MKV, MOV, VOB, TiVo, MPG, FLV and more to Sony TV compatible videos in simple clicks of mouse. Plus, with the built-in video editor, you can also choose to trim, crop, add watermark to your original videos. If you are Mac users, please turn to Dimo Video Converter Ultimate for Mac (Mavericks, Yosemite included), which has the same function as the Windows version.

No more talking, let's go straight in. First you need to download this program and get it installed. 

Free Download Dimo Video Converter Ultimate (Win/Mac):


Other Download: 

How to Convert MP4 files for Playing on Sony Bravia TV

Step 1 Load .MP4 files

Drag & drop MP4 files to the top MP4 to Sony TV video converter program directly. Or go to the "Add file" to locate the MP4 files you want to add. You can add several files to do conversion at the same time.


Step 2 Select the output Sony Bravia TV USB supported MP4 format.

Click "Select Format" bar to choose "Sony TV" as output format from "TV" which is so easy. Or select the format from "HD Video" or "Video" and choose MP4 or "HD MP4" as target format. Besides, you can also choose AVI, WMV, MP4, etc. if you want to get a relatively smaller output file.

Tip: To change the video size, video codec and bit rate, you can just click the "Settings" button. The video will be converted in the original video size if you start to convert the video now without any change. If you keep everything default original, the video can be converted without any quality lose. What's more, you can trim or crop the unwanted parts and then merge them into the new one by clicking "Edit" button, also set the aspect ratio at 16:9 or 4:3 as per your video needs in the "Adjust" interface to avoid any black bar. 


Step 3 Start to convert video to Sony Bravia TV

To start video to Sony Bravia TV conversion, click the "Start" button. It will take less than 10 minutes to convert a 1 hour length HD videos. Because this software can convert 30X faster than other converting program.

Step 4. Save the output video to USB disk

When the video conversion finished, open the folder and transfer it to your USB extra disk. Then plus your extra disk to Sony TV through the USB port, On your TV, find the menu to access this USB disk, and locate the MP4 video. Or stream it directly via Dimo Media Server. Your video should be playable for Sony Bravia TV now.

Free Download or Purchase Dimo Video Converter Ultimate:


Need the lifetime version to work on 2-4 PCs so that your friends and family can instantly broaden their entertainment options? Please refer to the family license here


Kindly Note:

The price of Dimo Video Converter Ultimate for Windows is divided into 1 Year Subscription, Lifetime/Family/Business License: $43.95/Year; $45.95/lifetime license; $95.95/family license(2-4 PCs); $189.95/business pack(5-8 PCs). Get your needed one at purchase page.

Related Software:

BDmate (Win/Mac)

Lossless backup Blu-ray to MKV with all audio and subtitle tracks; Rip Blu-ray to multi-track MP4; ConvertBlu-ray to almost all popular video/audio formats and devices; Copy Blu-ray to ISO/M2TS; Share digitized Blu-ray wirelessly.

DVDmate (Win/Mac)

A professional DVD ripping and editing tool with strong ability to remove DVD protection, transcode DVD to any video and audio format, and edit DVD to create personal movie.

Videomate (Win/Mac)

An all-around video converter software program that enables you to convert various video and audio files to formats that are supported by most multimedia devices.

8K Player (Win/Mac)

A mixture of free HD/4K video player, music player, Blu-ray/DVD player, video recorder and gif maker. 

Still got trouble of watching MP4 on your Sony Bravia TV via USB, then contact us to get online supports.

Related Articles:

Monday, May 8, 2017

Make 3D Videos and Movies for Oculus Rift


Fanciful to create 3D movies for playing on Oculus Rift? Certainly not. Maybe it has been imagined before, but in the prevailing Virtual Reality times, making 3D VR videos yourselves come true even you thought you are just an amateur. There are a few tricks required to be able to watch your own movie library on Oculus Rift, as well as convert incompatible videos for Oculus Rift in 3D. Read on.


How to create 3D MP4/MKV videos for Oculus Rift? 

To watch your own 2D/3D movies and even 360 degree videos on Oculus Rift with 3D effect, you can download a free VR player app like Virtual Desktop, which allows you to enjoy your movies in correct video mode. Just browser the videos and put on your Rift to enjoy.  

Why not play good movie sources with built-in Oculus Video App?

If you have an Oculus Rift, you have probably noticed the built in Video App. The Oculus App has several limitations which include:

* Inability to detect automatically 360-degree movies stored on your computer. Workaround: Rename any 360-degree movie you have so the filename ending with  _360, then the player will pick up the file for playback in 360 degrees.

* The player will play regular video files such as .MKV in a virtual movie theater, which is cool, but it will not play 3D movies or play any sound if the audio is encoded in DD5.1, DTS or any surround sound format

You may tired of the hundreds of simple trailers, demos and some shorts from online on Rift with 3rd party VR players. In these cases, you do the favor to seek the chance to see spectacular local films in Blu-ray, DVD, AVI, MKV, MTS, MXF, YouTube FLV, YIFY, etc. within Oculus Rift, can be done? 

So as to finish the task, you can adopt 3D movie creating software of Dimo Video Converter Ultimate for help. With it you can easily convert 2D/3D movies or rip Blu-ray/DVDs to MKV, MP4, AVI WMV with 3D effect to create true theater entertainment. 

If you have the colorful 3D glasses and 3D player on PC like Stereoscopic Player or 3D TV, it couldn't be more wonderful to create 3D Red-Green movies for them. If you're Mac users, then turn to Dimo Video Converter Ultimate for Mac, which allows you to create 3D videos for playback on Oculus Rift on Mac(including OS Sierra and OS X El Capitan). Now download the right version and follow the tips below to finish your job. 

Free Download Dimo Video Converter Ultimate (Win/Mac):


Other Download: 
Steps to Make 3D movies for playing on Oculus Rift

Step 1. Add own movie library

Install and launch the best 3D Converter for Oculus Rift, and add video files by clicking "Add file" or using "Drag & drop" method 


Step 2. Choose SBS 3D MP4/MKV as output format for Oculus Rift 

To watch mvoies on Oculus Rift with 3D effects, you can choose an Oculus Rift customized profile with its supported format

Go to the "Select Format" >"Device" >"VR" >"Oculus Rift" 

Step 3. Set Side-by-Side(SBS) for Oculus Rift VR 

Click "Edit" >"3D" >"left-right" >"OK". What's more, you can also use the useful build-in video editor in this Video Converter Ultimate to polish your video to get a better 3D visual entertainment. 


Note: Although there is a profile created by the application, if you like you can always change some parameters of resolution, compression, audio, etc to get your favor output 3D movies. 

An important issue that you must consider that in Oculus Rift VR resolution for each eye is not Full HD as the headset uses two separate OLED displays that receive their visual information from very powerful PCs running some of the world's best graphics cards. So you can free change your target video size, bitrate, frame rate in "Settings". Here, 720p (1280*720) with a higher bitrate around 5mbit/s is recommended. Higher resolutions for the specific format doesn't make the quality better but are a waste of power and battery life.

Step 4. Start to convert 2D/3D videos to SBS 3D MKV/MP4 for Oculus Rift 

At last, simply click the "Start" button, and the 3D SBS maker will start the conversion for playback with Oculus Rift. After conversion,  head to the destination folder where the converted files are stored (under "Open" button). After that, transfer them to Oculus Rift headset for playing.

How to Watch Movies On The Oculus Rift (Development Kit 2 DK2)? 

Here we go:

Step 1: Properly labeling your 360 and 3D videos
Before you can move your 360 and 3D videos to the Videos folder in your Windows system drive, it must be labeled in the proper format for Oculus to render it correctly.

Label 3D videos:

For 3D panoramic videos, top-bottom, bottom-top, left-right and right-left stereoscopic video support are implemented using the following naming convention:

Naming conventions used to label your 3D panoramic video:

"_TB.mp4" or "_360_TB.mp4" - Top / bottom 3D
"_BT.mp4" or "_360_BT.mp4" - Bottom / top 3D
"_LR.mp4" or "_360_LR.mp4" - Left / right side by side 3D
"_RL.mp4" or "_360_RL.mp4" - Right / left side by side 3D

Please add the proper naming convention to the end of your video file name.

Example: If your video file was MyCoolVideo.mp4, label it asMyCoolVideo_360_TB.mp4.

Label 360 videos:

360 videos in Oculus are implemented using spherical mapping to render panoramic videos. For your 360 video to be compatible with Oculus, add "_360" to the end of your file name. Example: If your video file was MyCoolVideo.mp4, label it as MyCoolVideo_360.mp4.

Step 2: Transfer your videos to Oculus Video

The Oculus Video app for Rift pulls video files from your default Windows video folder. To transfer your video files to the Windows Video folder:

Open your Windows System drive (this is generally your C: drive).
Open the Users folder.
Select your user profile.
Locate and open the Videos folder and move your videos here.

The next time you launch Oculus Video, your videos will automatically appear in the "My Videos" section.

How awesome is this? Yeah, it is that good! And then you can enjoy 3D movies on Oculus Rift (DK2) easily. With the innovative GUI, Dimo Video Converter Ultimate, the powerful software to create 3D movies for VR, has stepped into a whole new level of 3D performance and portability for VR videos. Wherever your ideas take you, you'll get there more than ever with adding 3D effects to own movie library, high-performance 3D Blu-ray/DVD ripping/handling based on 6X faster NVIDIA CUDA speed-up technology, state-of-the-art output VR presets like Oculus Rift,  Samsung Gear VR, HTC Vive, etc., and more. 

Free Download or Purchase Dimo Video Converter Ultimate:


Need the lifetime version to work on 2-4 PCs so that your friends and family can instantly broaden their entertainment options? Please refer to the family license here


Kindly Note:

The price of Dimo Video Converter Ultimate for Windows is divided into 1 Year Subscription, Lifetime/Family/Business License: $43.95/Year; $45.95/lifetime license; $95.95/family license(2-4 PCs); $189.95/business pack(5-8 PCs). Get your needed one at purchase page.

Related Software:

BDmate (Win/Mac)

Lossless backup Blu-ray to MKV with all audio and subtitle tracks; Rip Blu-ray to multi-track MP4; ConvertBlu-ray to almost all popular video/audio formats and devices; Copy Blu-ray to ISO/M2TS; Share digitized Blu-ray wirelessly.

DVDmate (Win/Mac)

A professional DVD ripping and editing tool with strong ability to remove DVD protection, transcode DVD to any video and audio format, and edit DVD to create personal movie.

Videomate (Win/Mac)

An all-around video converter software program that enables you to convert various video and audio files to formats that are supported by most multimedia devices.

8K Player (Win/Mac)

A mixture of free HD/4K video player, music player, Blu-ray/DVD player, video recorder and gif maker. 

Contact us or leave a message at Facebook if you have any issues.

Related Articles:

Wednesday, May 3, 2017

Tricks Importing MKV to Camtasia Studio 9/8 Smoothly

Camtasia Studio is professional screen recording and video editing software on Windows/Mac computer. It can merge, split, trim, crop, edit and create videos to share with others. Even though Camtasia Studio has been upgraded to 9.0.0 two months ago, users still fail to import videos to Camtasia Studio like MKV which are downloaded from Internet, because of MKV incompatibility with Camtasia. So how can you make .mkv files editable in Camtasia Studio (9, 8)?


How to get MKV Videos Imported by Camtasia Studio?

According to Techsmith support website, Camtasia Studio supports AVI, .WMV, MPEG-1, .MP3, .WAV, .WMA, MP4, MTS/M2TS and .MOV (QuickTime) files. In order to import MKV files to Camtasia Studio, it is necessary to ask how to convert MKV to formats like MOV, MPEG-1, etc. which are supported by Camtasia. Along with some help from third-party video converter software, it can be done effortlessly. 

To do that, you can use Dimo Video Converter Ultimate, this software can deal with almost all kinds of MKV videos. With it, users can effortlessly transcode (SD/HD/4K, H.264/H.265, 2D/3D) MKV files for smoothly editing in Camtasia Studio. What's more, it can generates more optimal editing formats/codecs for you to use in different NLE apps, such as Adobe Premiere Pro, Sony Vegas, Avid Media Composer, Windows Movie Maker and more. 

For Mac users, please get Dimo Video Converter Ultimate for Mac. If you're interested in doing likewise, check out the guide below to transcode MKV files to Camtasia Studio natively supported formats so that you can make engaging movies with your MKV clips.

Free Download Dimo Video Converter Ultimate (Win/Mac):


Other Download: 
[Quick workaround] Transcode MKV to Camtasia Studio 9/8 Friendly Format  

1. Add MKV files

Run the MKV converter for Camtasia and click "Add file" button to import the MKV files. As you can see, you can also drag and drop the media to the program's main interface.


2. Choose output format

Click "Select Format" bar and choose "MPEG-1" or "QuickTime MOV" from "Format > Video", which can be recognized by Camtasia. 

The following formats are able to be imported into Camtasia Studio for editing & production:

AVI, WMV, MPEG-1

MOV (QuickTime for Windows must be installed for MOV import.)   

MTS and M2TS files. (Version 8.4 and later)  You will need the AC-3 Filter if running Windows 7 or Winodws 8.0.  

MP4 (AVC/h.264 at no more than 30 frames per second)

MP3,WAV,WMA 

Tips: 

a. Click the Settings icon to adjust video and audio parameters on the Profile Setting as you need to get the best quality video since Camtasia Studio 9, 8 is optimized for high definition video editing.  


b. To make a highlight video out of downloaded MKV before converting, you can do some trimmings first:

To start with, click the “Edit” button. In the new video editor, find the “trim” tab, in the timeline, set the start time point and the end time point in the "start" and "end" boxes. And, finally click the “OK” button to finish editing. You can also change your new clip length by clicking “Delete” button. Also you are able to merge many separate trimmed segments into one.

3: Starting converting MKV files

Simply click the "Start" button to start converting MKV to Camtasia Studio and everything else will be automated. If you have added quite a bunch of video files, it would take some time to convert. You're done. Now your MKV files will be converted into MPEG-1/MOV files ready to be imported to Camtasia Studio beautifully. Then customize and edit into your own video for sharing with your clients, your students or your friends. 

In addition to convert videos like MKV, MXF, MP4, MOV, etc. to Camtasia, Dimo Video Converter Ultimate can also encode Camtasia Studio recorded videos to play and share anywhere you like or even export to MKV as well. Have a try!

Free Download or Purchase Dimo Video Converter Ultimate:


Need the lifetime version to work on 2-4 PCs so that your friends and family can instantly broaden their entertainment options? Please refer to the family license here


Kindly Note:

The price of Dimo Video Converter Ultimate for Windows is divided into 1 Year Subscription, Lifetime/Family/Business License: $43.95/Year; $45.95/lifetime license; $95.95/family license(2-4 PCs); $189.95/business pack(5-8 PCs). Get your needed one at purchase page.

Related Software:

BDmate (Win/Mac)

Lossless backup Blu-ray to MKV with all audio and subtitle tracks; Rip Blu-ray to multi-track MP4; ConvertBlu-ray to almost all popular video/audio formats and devices; Copy Blu-ray to ISO/M2TS; Share digitized Blu-ray wirelessly.

DVDmate (Win/Mac)

A professional DVD ripping and editing tool with strong ability to remove DVD protection, transcode DVD to any video and audio format, and edit DVD to create personal movie.

Videomate (Win/Mac)

An all-around video converter software program that enables you to convert various video and audio files to formats that are supported by most multimedia devices.

8K Player (Win/Mac)

A mixture of free HD/4K video player, music player, Blu-ray/DVD player, video recorder and gif maker. 

Contact us or leave a message at Facebook if you have any issues.

Related Articles: