Wednesday, April 12, 2017

Panasonic TV won't import and open MP4? Resolved!


With Panasonic, the longest-standing television manufacturers that has been at the forefront of TV design for many years, and its   impressive television models, including plasma, Viera TV, LED, LCD, OLED, and 4K TVs, you can enjoy all kind of media files on Panasonic television.   However, when you tried to add some kinds of MP4 videos to Panasonic TV for enjoyment via USB flash drive, you may fail to do the job. So, what's the problem? How to solve "Panasonic TV not playing MP4" issue? Read on detailed solutions. 


Why Panasonic TV won't play MP4 files? 

To play all kinds of MP4 on Panasonic TV, you need to choose  corresponding preferred codec for your TV model. From Panasonic TV official website we know that Panasonic TV is only compatible with MP4 in H.264/MPEG-4 AVC video codec and AAC audio codec. However, MP4 is a container format which contains various kinds of video and audio codecs. Once the MP4 files can't meet the requirement of Panasonic TV input format and codec, you'll get into trouble to play MP4 in Panasonic TV. 

Besides this, there are some other possible reasons: 

* The damaged MP4 Video content will not play correctly on Panasonic TV
* When you play MP4 video on Panasonic TV over a network connection, the video may not be played smoothly. 
* If the Index Table is in error, the Seek (Jump) function is not supported. 

Best Workaround to Solve Panasonic TV Won't Play MP4 

There is no better way to watch MP4 on Panasonic TV than to convert MP4 to Panasonic TV compatible formats like MP4 and MKV. Thankfully, there are quite a lot of web-based video converter applications available specifically for people to convert media files. 

It's recommended to use Dimo Video Converter Ultimate to do conversion. It is ensured that this tool will enable you to:
  • Convert all kinds of video and audio types including 2D/3D MP4, SD/HD/4K MP4, H.264/H.265 MP4, AVI, MKV, FLV, MPG/MPEG, WMV, MOV, FLAC, WMA, etc.  
  • World's fastest speed to convert MP4 to Panasonic TV, thanks to the NVIDIA CUDA hardware acceleration tech 
  • Directly accomplish MP4 to Panasonic TV conversion preset profiles for TV   
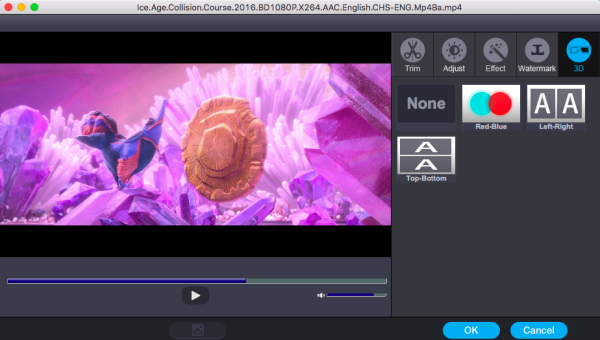
  • Trim, crop, rotate videos, add effect/watermark, create 3D to meet your needs.   
  • Adjust the parameters of video and audio files.   
  • Free share videos from  computer in common formats to mobile devices or TV wirelessly   
  • Perfectly compatible with Windows PC, no matter the latest Windows 10, 8.1 or earlier ones
If you're a Mac user, simply turn to Dimo Video Converter Ultimate for Mac, which has the same function as the Windows version. Now download the program according to your computer system and follow the simple guide below to get incompatible MP4 files to play on Panasonic TV nicely. 

Free Download Dimo Video Converter Ultimate (Win/Mac):


Other Download: 
Guide: Convert and play MP4 video on Panasonic TV 

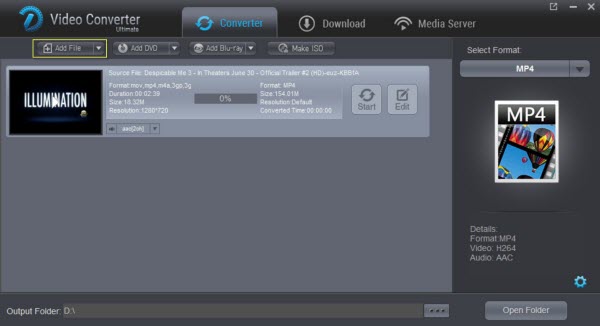
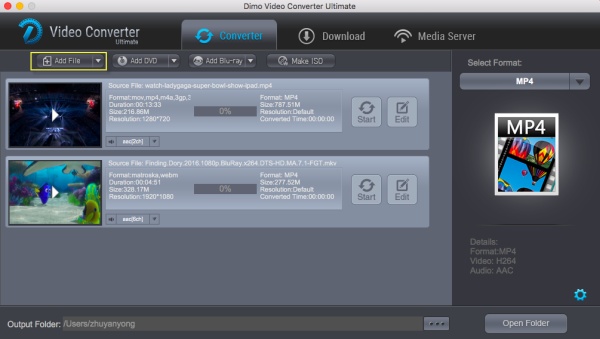
Step 1: Add MP4 files 
 
Install and launch the MP4 file converter, and then click "Add File" button to import your .mp4 to the software one by one.


Step 2: Set output video format 

Click "Select Format" bar and select "Device > TVS > Panasonic TV" video as target format. The optimized output format will contains the best video settings for playback on your anasonic TV.  

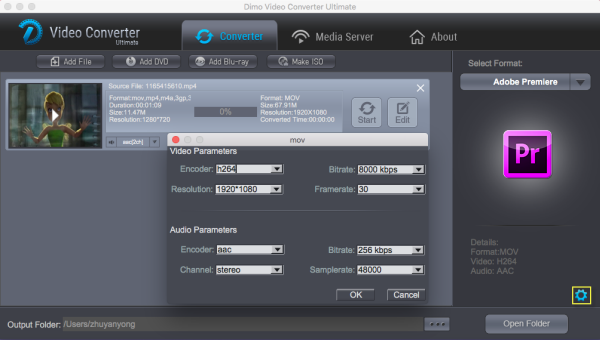
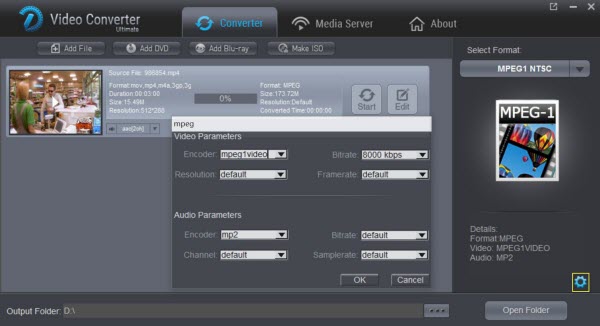
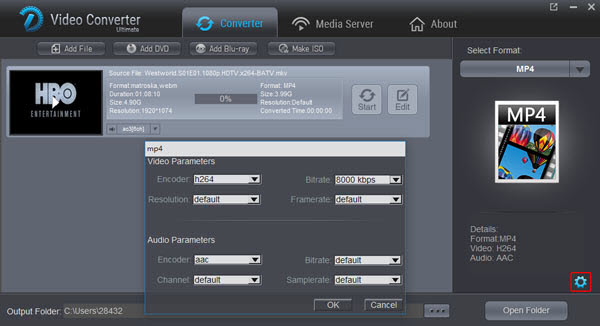
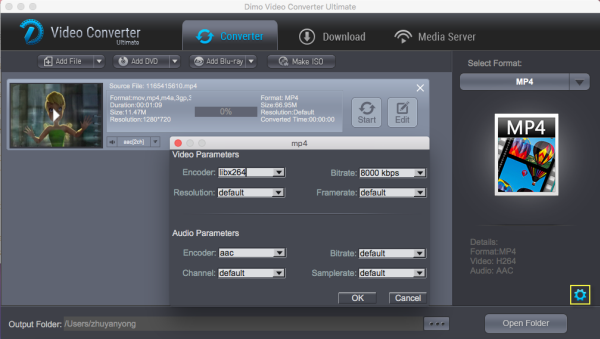
Tip: This top MP4 to Panasonic TV Converter enables you to modify the output parameters. You can click the Settings icon and adjust the video bitrate, codec, frame rate, audio sample rate, etc parameters. 

Step 3: Start MP4 to Panasonic TV conversion 
 
Hit the "Start" button; this video converter will start to convert MP4 to Panasonic TV for playback.  After the conversion, click "Open" in the main interface to locate the output videos.Then it would be easy to transfer and play MP4 files on Panasonic TV   via USB, DLNA, WLAN  or Dimo Media Server below. 


1- Network connection: Make sure that the PC/Mac and Panasonic TV are connected to the same home Wi-Fi. 
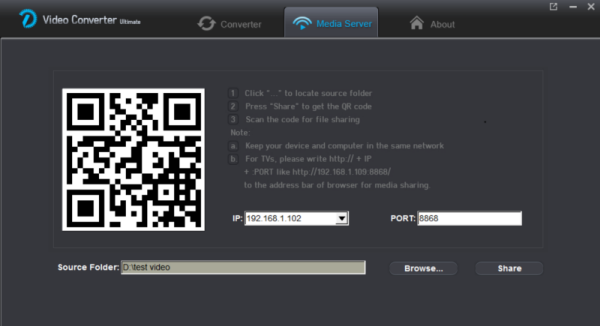
2- Open Dimo Video Converter Ultimate and click "Media Server" tab. 
3- Click on "Browse" button to choose the location which store your source movies. 
4- Click "Share" to begin sharing local videos to Panasonic TV. Don't close the free Media Server for Dimo. 
5- Open the browser on Panasonic TV and input the website URL "http://IP:PORT" like "http://192.168.1.109:8868/" (without quotation marks) into the address bar. 
6- The loaded video source will be listed and you can now play converted MP4 movies on your Panasonic TV. 

The Panasonic TV MP4 support issue has been excellently solved. Then just enjoy your life in front of the home theater.

Free Download or Purchase Dimo Video Converter Ultimate:


Need the lifetime version to work on 2-4 PCs so that your friends and family can instantly broaden their entertainment options? Please refer to the family license here


Kindly Note:

The price of Dimo Video Converter Ultimate for Windows is divided into 1 Year Subscription, Lifetime/Family/Business License: $43.95/Year; $45.95/lifetime license; $95.95/family license(2-4 PCs); $189.95/business pack(5-8 PCs). Get your needed one at purchase page.

Contact us or leave a message at Facebook if you have any issues.

Related Articles:

Monday, April 10, 2017

Solution to Importing MKV files into Adobe Premiere Pro CS5/CS6/CC


Facing problems when opening MKV files or editing MKV videos in Adobe Premiere Pro CS5/CS6? Just get the best MKV to Premiere Converter to achieve your goal smoothly.

While looking to edit some MKV movies (ripped with MakeMKV, download from online or from other source), the only problem is that NLE like Adobe Premiere Pro won't import MKV files directly, and you may come across lots of problems, such as nothing shows up on the screen, or there is only image or you only get sound in Premiere Pro. If you're having trouble editing MKV files in Premiere Pro CC (2017), CS6, CS5, etc., just read on for details.


Actually, Adobe Premiere Pro supported video formats do not include MKV format. So what's the best way to resolve the MKV and PPro incompatibility issue? Well, as we've found out yet, the easy workaround is to transcode MKV to a more editing-friendly format, such a Premiere Pro's MOV or MPEG-2 codec. with Dimo Video Converter Ultimate for Mac.

It's an optimal MKV converter that helps you decode MKV files when converting into a different, and ideally more edit friendly format for Premiere Pro. So you can edit MKV footage with Premiere Pro CC/CS6/CS5 without any issue. Beside, this video convert program can also help to convert MKV to Avid Media Composer, Final Cut Pro, iMovie, FCE, etc. Plus, with the built-in video editing feature of the program, you can trim, crop, add watermark, set effect and more to your video files so as to bring you a wonderful home movie as you want. If you want to transcode MKV to Premiere Pro on Windows, please turn to Dimo Video Converter Ultimate. Now download the software and follow the steps to re-encode .mkv to Premiere Pro for editing.

Free Download Dimo Video Converter Ultimate for Mac/Win:


Other Download: 


How to Successfully Import MKV into Premiere Pro CC/CS6/CS5

Step 1: Import MKV files

Run MKV to Premiere Converter for Mac and load source MKV clips to it. You can import MKV clips to the program through "Add File" button. You can also directly drag the video files into the program directly. Not only MKV file, but also MP4, AVI, VOB, WMV, FLV, etc are supported. Batch conversion is supported by the latest 3.0.0 version, so you can load more than one file to save time.


Step 2: Choose Premiere Pro preferred format

Click "Select Format" pull down list to select "Editor > Adobe Premiere" as the best video format for Premiere Pro. WMV, MPEG-2 formats from "Format > Video" are the good choice as well.

Tip -Profile Settings: In case the default settings do not fit your requirement, you can click "Settings" button and enter "Profile Settings" panel to adjust video size, bit rate, frame rate, sample rate and audio channels.


Step 3: Start conversion

Click "Start" button to start convert MKV for importing to Premiere Pro CC/CS6/CS5. When the conversion task is finished, click "Open" button to get the exported files.

Step 4: Import converted MKV files into Premiere Pro

You're now ready to get the result files into Adobe Premiere Pro to do further editing. Launch Premiere Pro on your Mac, choose "File > Import" to import any file. If you prefer to use keyboard shortcuts, press Command+I to open the standard Import dialog.

Free Download or Purchase Dimo Video Converter Ultimate for Mac/Win:


Need the lifetime version to work on 2-4 Macs so that your friends and family can instantly broaden their entertainment options? Please refer to the family license here


Kindly Note:

The price of Dimo Video Converter Ultimate for Mac is divided into 1 Year Subscription, Lifetime/Family/Business License: $43.95/Year; $45.95/lifetime license; $95.95/family license(2-4 Macs); $189.95/business pack(5-8 Macs). Get your needed one at purchase page.

Related Software:

BDmate (Mac/Win)

Lossless backup Blu-ray to MKV with all audio and subtitle tracks; Rip Blu-ray to multi-track MP4; Convert Blu-ray to almost all popular video/audio formats and devices; Copy Blu-ray to ISO/M2TS; Share digitized Blu-ray wirelessly.

DVDmate (Mac/Win)

A professional DVD ripping and editing tool with strong ability to remove DVD protection, transcode DVD to any video and audio format, and edit DVD to create personal movie.

Videomate (Mac/Win)

An all-around video converter software program that enables you to convert various video and audio files to formats that are supported by most multimedia devices.

8K Player (Mac/Win)

A mixture of free HD/4K video player, music player, Blu-ray/DVD player, video recorder and gif maker. 

Contact us or leave a message at Facebook if you have any issues.

Related Articles:

Friday, April 7, 2017

Tricks Importing MP4 to Camtasia Studio 9/8/7 Smoothly


In this post, we’ll examine how to import Mp4 into Camtasia Studio for editing with smooth workflow.

You would handle kinds of video files daily, including YouTube MP4 videos, Sony MP4 Camcorder videos(XDCam-EX), GoPro MP4 footage, game MP4 recordings with OBS(Open Broadcaster Software), etc. And in order to get more wonderful videos, you probably will choose to edit .mp4 files with Camtasia which is a good option your screen and edit your videos to get professional-like videos before sharing to YouTube or FaceBook. While, there are dozen of .mp4 files can't be imported into Camtasia software, for the complex video codec of MP4 files. This article will be along with you to root the trouble and solution out here.


Some people including you may be confused: Camtasia says it supports MP4 at Techsmith support site, but why I can't import MP4 to Camtasia Studio? Well, that's because Camtasia prefers AVC/h.264 at no more than 30 frames per second instead of others while MP4 can contain various video codecs. So if you MP4 files are not accepted by Camtasia Studio, it's probably because of the video codec incompatibility.

To fix the problem, you'll need to convert those MP4 to a more editing-friendly format for Camtasia Studio with a MP4 file converter app. Dimo Video Converter Ultimate which is an easy-to-use MP4 converter for you, which can help you change MP4 into a Camtasia Studio accepted MPEG-1/MOV/MP4 with least quality loss. You should then be able to import the new file into Camtasia Studio with smooth editing without any trouble. 

The all-in-one and easy-to-use toolkit can convert all other popular video formats like AVI, MOVMXF, WMV, MKV, FLV, ASF, M2TS, VOB, etc. to Camtasia Studio natively supported video formats on Windows (Windows 10 included) with fast encoding speed. For Mac users, just get Dimo Video Converter Ultimate for Mac to get th job done. See how below about converting MP4 files to Camtasia Studio format.

Free Download Dimo Video Converter Ultimate (Win/Mac):


Other Download: 

How to Convert MP4 files for Editing in Camtasia Studio 9/8/7

Step 1. Load .MP4 files

Drag & drop MP4 files to the program directly. Or go to the "Add file" to locate the MP4 files you want to add. You can add several files to do conversion at the same time.


Step 2. Select the output format

Click "Select Format" bar and then move your pointer to "Format" and turn to "HD Video" or "Video" and choose MPEG-1 or MOV as target format. Besides, you can also choose AVI, WMV, MP4, etc. if you want to get a relatively smaller output file.

Step 3 (optional): Adjust the video, audio settings

Click "Settings" to fix the frame rate, bitrate, video size, etc to your needs. If you want to edit in Camtasia Studio without having to render the clips while editing, all the frame sizes must be the same as the sequence settings. You can save a lot of render time by making all the clips the same size with this MOV video converter.


Tip: Furthermore, you are provided some useful edit functions cropping, trimming, adding watermark, adjusting effects for pre-editing your video files so that you can simplify your Camtasia Studio editing.

Step 3. Start MP4 to Camtasia Studio conversion 

Click the "Start" button to start the MP4 to Camtasia conversion. Just in a few minutes, you make it.

Step 4. Import MP4 into Camtasia Studio

After the conversion, click "Open" to locate the result videos and then launch Camtasia Studio and click "Import media" import the converted MP4 video into Camtasia Studio; prepare for editing. You will find that it's just a piece of cake to edit MP4 files in Camtasia Studio. 

After editing or recording, you can export video toCamtasia Studio for playing and sharing.

Free Download or Purchase Dimo Video Converter Ultimate:


Need the lifetime version to work on 2-4 PCs so that your friends and family can instantly broaden their entertainment options? Please refer to the family license here


Kindly Note:

The price of Dimo Video Converter Ultimate for Windows is divided into 1 Year Subscription, Lifetime/Family/Business License: $43.95/Year; $45.95/lifetime license; $95.95/family license(2-4 PCs); $189.95/business pack(5-8 PCs). Get your needed one at purchase page.

Related Software:

BDmate (Win/Mac)

Lossless backup Blu-ray to MKV with all audio and subtitle tracks; Rip Blu-ray to multi-track MP4; ConvertBlu-ray to almost all popular video/audio formats and devices; Copy Blu-ray to ISO/M2TS; Share digitized Blu-ray wirelessly.

DVDmate (Win/Mac)

A professional DVD ripping and editing tool with strong ability to remove DVD protection, transcode DVD to any video and audio format, and edit DVD to create personal movie.

Videomate (Win/Mac)

An all-around video converter software program that enables you to convert various video and audio files to formats that are supported by most multimedia devices.

8K Player (Win/Mac)

A mixture of free HD/4K video player, music player, Blu-ray/DVD player, video recorder and gif maker. 

Contact us or leave a message at Facebook if you have any issues.

Related Articles:

Saturday, March 25, 2017

How to Get VLC to play MKV files perfectly

Having problems playing MKV on your VLC player? Don't worry! The tutorial shows you how to get MKV video files to play on VLC player without any problem.

Since VLC becomes a popular open source multimedia player, many people have been wondering "Can VLC Player Play MKV files?" Does VLC play MKV video? According to From VideoLAN official website, we learn that MKV is really one of VLC Player supported video formats. However, sometime we still fail to play MKV in VLC. Common issues have often troubled many guys: "Can't hear the sound of MKV files at all", "VLC stuttering or choppy when playing MKV" or "VLC just load MKV file all the time". In this article, we aim to work out possible 3 solutions to help you play MKV with VLC Media Player smoothly.

How to Play All Kinds of MKV in VLC Media Player?

Solution 1: Convert MKV to VLC Player more compatible formats - Convenient Way

Since MKV is a container format which may contain multiple video and audio streams. And the video and audio stream can be encoded any of several ways. If the MKV video or audio codec is not VLC Player supported one, VLC Media Player won't play MKV video of this kind. In order to solve "VLC Media Player won't play MKV files and to successfully play any MKV video in VLC Media Player, we had better convert MKV to VLC most supported video format like MP4 for smooth playback instead of downloading a codex bundle.

Here Dimo Video Converter Ultimate is recommended to help you achieve the goal. It is one of the top video converters for Windows 10, 8, 7, etc. With this software in hand, you can convert any videos including MP4MKV, AVI, VOB, Tivo, MTS, MXF, MOV, MPG, etc. to VLC supported file formats. 

Free Download Dimo Video Converter Ultimate (Win/Mac):


Other Download: 
Moreover, it can help compress 1080p HD, 4K UHD videos for smooth playback on your media player or multimedia devices with minimum quality loss. It is very efficient since it allows you to convert either the whole video or parts of it. You can also crop the video to get your desired results.  you are Mac users, please turn to the equivalent Mac version named Dimo Video Converter Ultimate for Mac to transcode .mkv files to VLC on Mac OS X (Sierra, El Capitan included). If you're stuck in VLC media player, just download it and start the conversion following the tutorial below. 


How to convert MKV to VLC Media Player

STEP 1. Add MKV video

Start up the MKV to VLC Media Player converter, and then click "Add File" to import all .MKV files.  


STEP 2. Choose VLC's feasible format as output format

Click the "Select Format" menu, select VLC Media Player friendly format as your output video format. There, you can take MP4, AVI or MKV from "Format > Video" as your output video format. If you prefer high definition videos, move your mouse pointer to "Format > HD Video" and then choose HD MP4, HD AVI or HD MKV.

Tip 1: The smart MKV file converter additionally offers some useful edit functions to enhance your video. Click the Edit button to get it.

Tip 2: You can adjust the parameters by clicking "Settings" button, choose the resolution, bitrate, frame rate as you want.


STEP 3. Start converting MKV to VLC Media Player

Click "Start" button to start MKV conversion for playing with VLC Media Player. The conversion process will take a while, and you'll see an encoding progress bar. Once finished, click the Open button in the main interface and you can locate the encoded MKV files effortlessly. And then you are able to add them to your VLC for playback easily without any issues.     

Solution 2. Seek for A VLC Alternative - Fast way


Rather than asking "Does VLC play MKV?", "How can I import MKV to VLC?", "How to stop VLC freezing", why not switch to another media player as so many good players are available out there. Here 8K Player for Win/Mac will definitely worth a shot. As an all-around free media player, it can freely open and play all SD/HD/4K/8K videos and audios in MKV, MP4, AVI, WMV, MOV, MP3, FLAC, etc smoothly! No need to install any codec packs, plug-ins or components. If you need to play Blu-ray or DVD discs, you can free download the 8K Player Blu-ray Power to have a try.

Free Download 8K Player for Win/Mac (Blu-ray Power) :


Solution 3: Install appropriate codec pack - A Universal Solution

There are various free codec packs online which will allow us to decode and play MKV files. The disadvantage of this approach is that you have to download a lot of codecs but if you are only trying to play one type of video file. It is hard to find the right encoder for each MKV video. Another shortcoming is these codecs not always work well as MKV videos always been encoded in several ways.

Other solutions you may need:
VLC Player No Sound Solution: Solution 1, Unmute your VLC Player; Solution 2, select Tools > Preferences menu to open Preferences dialog, select Audio on the left, and confirm Enable audio is checked. Then Click Output module drop-down button and try a different default.

MKV Skipping Solution: Select Tools > Preferences menu to open Preferences dialog, then select All at the bottom of the dialog, and then select Input/Codecs on the left. On the right of the dialog, in Advanced group, set the value of File caching to 1000.

Choppy Solution: Try to disable hardware decoding. Go to Tools > Preferences menu, select Input/Codecs > Video codecs > FFmpeg. And then set the value of Hardware decoding to Disable in Decoding group.

For users who prefer to stick with VLC and do not want to convert MKV to VLC supported formats or use another MKV Player either, there are left with no choice but to tweak some settings with VLC itself or disable the hardware decoding. But it does not always work out and you may get confused if setting stuff is totally new to you. So tohelp you with can't play MKV in VLC Media Player playback trouble, finding an MKV Player alternative or MKV Converter will be more effective.

Free Download or Purchase Dimo Video Converter Ultimate:


Need the lifetime version to work on 2-4 PCs so that your friends and family can instantly broaden their entertainment options? Please refer to the family license here


Kindly Note:

The price of Dimo Video Converter Ultimate for Windows is divided into 1 Year Subscription, Lifetime/Family/Business License: $43.95/Year; $45.95/lifetime license; $95.95/family license(2-4 PCs); $189.95/business pack(5-8 PCs). Get your needed one at purchase page.

Related Software:

BDmate (Win/Mac)

Lossless backup Blu-ray to MKV with all audio and subtitle tracks; Rip Blu-ray to multi-track MKV; ConvertBlu-ray to almost all popular video/audio formats and devices; Copy Blu-ray to ISO/M2TS; Share digitized Blu-ray wirelessly.

DVDmate (Win/Mac)

A professional DVD ripping and editing tool with strong ability to remove DVD protection, transcode DVD to any video and audio format, and edit DVD to create personal movie.

Videomate (Win/Mac)

An all-around video converter software program that enables you to convert various video and audio files to formats that are supported by most multimedia devices.

Contact us or leave a message at Facebook if you have any issues.

Related Articles:
Source: How to Play all MKV files in VLC Media Player

Thursday, March 16, 2017

How to Rip DVD Movies for Playback with Google Cardboard

This guide teaches you how to transfer and view DVD movies on Gear VR with virtual reality experience by ripping DVD to Gear VR playable 3D videos.

Google Cardboard, another excellent virtual reality headset followed with Samsung Gear VRZeiss VR One, has gained widespread reputations amongest 3D lovers, not only because of its lower price, but also its powerful compatibility with nearly any smartphones including Android and iPhone. If you happen to have a bunch of DVD collections at home, it's a pity for you can not get them on your Andorid/iOS devices through Google Cardboard with 3D Effects. In this article, I'll glad to share some useful tips to help you move your DVD medias into Google Cardboard for viewing freely on your smartphone. 

As a matter of fact, Google Cardboard lacks ability to play DVD movies but it can play Side-by-Side MP4 videos. So in order to watch DVD in Google Cardboard, firstly you'll rip and convert DVDs to SBS MP4 videos. To do this, you can use Dimo Video Converter Ultimate for Mac. With it, you can convert 2D DVD as well as 2D/3D Blu-ray to Google Cardboard supported side-by-side video files with lossless quality. In addition, it offers other 3D videos as MKV Top-bottom 3D video, MP4 top-bottom 3D video, MKV side-by-side 3D video, which can play on Gear VR, VR One, Oculus Rift DK2, PS VR, Google DayDream View etc. perfectly.

Free Download Dimo Video Converter Ultimate for Mac/Win:


Other Download: 
Ripping DVD for viewing in Google Cardboard is simple as ABC. After downloading, follow the wizard to install and run the program. Then follow the steps below to convert DVD to MP4/MKV SBS video. The below guide takes DVD Ripper for Windows (macos Sierra compatible) screenshots for example. If you're using a Windows PC, simply turn to Dimo Video Converter Ultimate, which has the same function as the Mac version. Keep in mind that you have download the rght version, Mac OS .dmg files cannot be installed on Windows platform – and vice versa.

Simple Steps to Rip DVD for watching on Google Cardboard

a: Load DVD movies

Insert your DVD disc into your DVD-ROM, run Dimo DVD to VR video converter and click "Add DVD" icon to load DVD movies.


b: Choose output format

Click the format bar to follow "Format > Video" and choose the MP4 or MOV format which can fit your Google Cardboard or mobile phone perfectly.

Tip: If you like, you can click "Settings" which is next to "Format", free change your target video size, bitrate, frame rate and 3D depth. If you want to get best video quality, pls switch them to "original".


c: Select 3D effects 

Click on "Edit" > 3D and choose 3D effect (Red-Blue, Left-Right, Top-Bottom three modes) from the option. Here "Left-Right" can be set to get a side-by-side video. You are able to get immediate preview of 3D effect within the built-in player. 


c: Start DVD ripping

Click the "Start" button, and the DVD ripper will start the conversion from DVD movies to 3D SBS video for Google Cardboard. After conversion, open output file destination, locate the created SBS 3D MP4 video and you could view the ripped DVD movies in Google Cardboard via iPhone/Android as you want. You can adjust your phone left or right in your Cardboard holder to help to maximize the 3D depth as well as focus the viewing area as closely to the center of the screen as possible.

Note: You'll have to download the compatible iOS or Android VR player apps that are capable of projecting stereoscopic content. Learn more and get your own Cardboard viewer at http://g.co/cardboard.

Free Download or Purchase Dimo Video Converter Ultimate for Mac/Win:


Need the lifetime version to work on 2-4 Macs so that your friends and family can instantly broaden their entertainment options? Please refer to the family license here


Kindly Note:

The price of Dimo Video Converter Ultimate for Mac is divided into 1 Year Subscription, Lifetime/Family/Business License: $43.95/Year; $45.95/lifetime license; $95.95/family license(2-4 Macs); $189.95/business pack(5-8 Macs). Get your needed one at purchase page.

Related Software:

BDmate (Mac/Win)

Lossless backup Blu-ray to MKV with all audio and subtitle tracks; Rip Blu-ray to multi-track MP4; Convert Blu-ray to almost all popular video/audio formats and devices; Copy Blu-ray to ISO/M2TS; Share digitized Blu-ray wirelessly.

DVDmate (Mac/Win)

A professional DVD ripping and editing tool with strong ability to remove DVD protection, transcode DVD to any video and audio format, and edit DVD to create personal movie.

Videomate (Mac/Win)

An all-around video converter software program that enables you to convert various video and audio files to formats that are supported by most multimedia devices.

8K Player (Mac/Win)

A mixture of free HD/4K video player, music player, Blu-ray/DVD player, video recorder and gif maker. 

Contact us or leave a message at Facebook if you have any issues.

Related Articles:
Source: Watch DVD Movies on Google Cardboard via Android/iPhone Handset